Configuring Settings for Recovery for Azure AD
To collect backup snapshots of your Azure AD and recover unwanted changes, perform the following configuration steps in your Azure infrastructure.
-
Log in to the Azure Portal. The account you use must be granted at least Cloud Application Administrator and Privileged Role Administrator roles.
-
Select Azure Active Directory and then specify App registrations.
-
Select New registration to create a new Azure AD application.
-
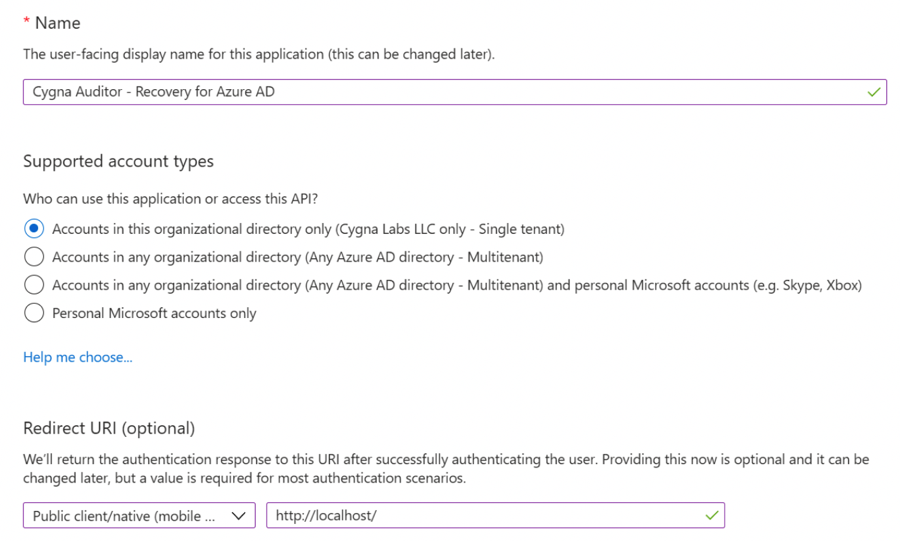
Provide an application name (e.g., Cygna Auditor - Recovery for Azure AD), specify the supported account types, and add a Redirect URI. Then select Register to create the new application.
-
Copy the Application ID and Directory (tenant) ID.
-
In the new app, proceed to Authentication / Advanced Settings and set Enable the following mobile and desktop flows to "Yes". Save.
-
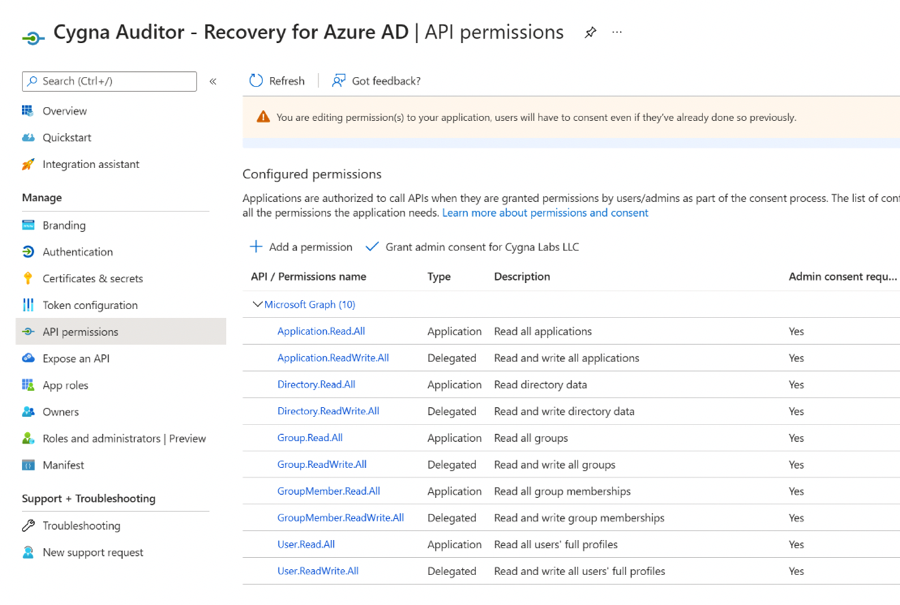
In the left navigation bar, select API permissions, select Microsoft Graph, and add the following permissions:
Permission
Type
Application.ReadWrite.All
Delegated
Directory.ReadWrite.All
Delegated
Group.ReadWrite.All
Delegated
GroupMember.ReadWrite.All
Delegated
User.ReadWrite.All
Delegated
Application.Read.All
Application
Directory.Read.All
Application
GroupMember.Read.All
Application
GroupMember.Read.All
Application
User.Read.All
Application
Note: If your tenant has MFA enabled, the "Recover As" functionality will not work as the underlying Graph API does not support MFA for these operations. In this case, either the local AD account must have permission to perform Recovery operations, or you may grant ReadWrite (instead of Read) access to the Application. For the second option, Recovery will work from within Cygna Auditor, but all operations will be performed by the Application instead of the User.
-
Select Grant admin consent to to confirm these permissions for the newly-created application.
- Navigate to Certificates & secrets and create a secret for the application. For security purposes, use this secret only for collection and recovery operations made by Cygna Auditor.
Select New client secret, provide a description and expiry, then select Add. Note that recovery collections will stop after the expiry and you will need to generate a new secret at that time.
Copy the value to use later. These values will be inaccessible after you leave this screen.