Setting Up the Storage Machine
The storage machine holds every backup. Domain controllers write each backup into a staging area over SMB, and the storage agent then verifies it and moves it into the vault, which has no share and cannot be reached over the network. Under the storage root, the agent keeps three folders:
<StorageRoot>\staging—Where domain controllers write backups in progress. You share this folder.<StorageRoot>\vault—Where committed backups are kept. It is never shared.<StorageRoot>\manager-backups—Where the Manager's encrypted configuration backups are kept, the copies from which a lost Manager is rebuilt. It has the vault's permissions and is never shared. See Manager Configuration Backups.
Setting up the machine takes four tasks, in this order: prepare the storage folder, share the staging folder, open the firewall for SMB, and install the storage agent. Turning on auditing is also recommended. The agent looks for its staging share when it starts, so create the share before you install it.
For how backups move through staging into the vault, see How Backup Works.
Before you begin
- Use a machine running 64-bit Windows Server 2019 or later that is not joined to a domain and has a fixed IP address. It can be the Manager machine, but never a domain controller. See System Requirements.
- Provide a volume with enough space for the backups you plan to keep. See Sizing Backup Storage.
- Put the storage root on a local NTFS or ReFS volume. The storage agent watches the vault through the volume's change journal, which other file systems and network shares do not have. See Detecting changes to committed backups.
- Turn on BitLocker for that volume, with auto-unlock, so that the backups are encrypted at rest and the volume is available after a restart. See Encrypting the vault volume.
- Install the Manager and complete the first sign-in. See Installing the Manager and Signing In for the First Time.
- Have the enrollment token the Manager was installed with.
- Sign in to the storage machine with a local administrator account.
Prepare the storage folder
Choose an absolute path on the storage volume for the storage root, for example E:\CygnaDR. You give this path to the installer as STORAGEROOT, and it cannot be changed from the Manager.
Create the storage root and its staging folder now, so that you can share the folder before the agent starts:
New-Item -ItemType Directory -Path E:\CygnaDR\staging
The agent creates the vault and manager-backups folders itself and sets the permissions on all three folders when it starts.
Note: The storage agent does not start if the storage root is unreachable. If the volume is attached after the agent is installed, restart the agent once the volume is present.
Share the staging folder
Create an SMB share over <StorageRoot>\staging. Share this folder only:
- Do not share the storage root. A share over the root also exposes the vault beside the staging folder.
- Do not rely on an administrative share such as
E$. The agent ignores administrative shares.
For example, in an elevated PowerShell session:
New-SmbShare -Name CygnaDRStaging -Path E:\CygnaDR\staging -FullAccess "BUILTIN\Administrators"
You do not need to grant domain controllers access to the share. Each backup job uses a local account that the storage agent creates for that job only. When the agent starts, it checks the share's permissions and grants its CygnaDR Staging Writers group the Change permission if it is missing. If share permissions are controlled by someone else in your organization, you can turn this off with the Manage the staging share's permissions setting; the agent then only reports what is missing.
Don't open the staging share, or the staging folder through another share, with any other account, for example to look at it. The storage agent reports any account other than a job's own as Unexpected SMB connections to the staging share, a critical alert. Work in the folder locally on the storage machine instead.
Open the firewall for SMB
Domain controllers reach the staging share over TCP port 445, and so do recovery environments when they read a backup during a full system recovery. The storage agent installer does not open this port. Allow inbound TCP 445 from your domain controllers' addresses, for example:
New-NetFirewallRule -DisplayName "Cygna DR staging (SMB)" -Direction Inbound -Protocol TCP -LocalPort 445 -RemoteAddress 10.0.1.0/24,10.0.2.0/24 -Action Allow
Replace the addresses with the subnets your domain controllers use. If you plan server recoveries onto replacement machines, include the networks those machines are on. For the full list of ports, see Ports and Protocols.
Turn on auditing (recommended)
The storage agent reads the storage machine's audit policy and never changes it. For it to see every connection to the staging share, however short, and to say who changed a committed backup, turn on success auditing for Logon, File Share, Detailed File Share, and File System in the Advanced Audit Policy of the storage machine. See Audit policy on the storage machine.
auditpol /set /subcategory:"Logon" /success:enable
auditpol /set /subcategory:"File Share" /success:enable
auditpol /set /subcategory:"Detailed File Share" /success:enable
auditpol /set /subcategory:"File System" /success:enable
Install the storage agent
Install the storage agent by hand on the storage machine, with the command line the console builds for you. After that first install, it updates itself from the Manager, unless a policy on the storage machine turns that off. See Maintaining Agents.
An installation has one storage machine: the first storage agent to enroll. A storage agent installed on another machine after that is a candidate and is given no work until the storage machine is replaced with it, which ends every restore point. To move the storage machine later, for example from a trial setup into production, see Moving the Storage Machine or an Isolated Recovery Host.
To install the storage agent:
-
In the console, select Administration > Agents.
Before any agent has enrolled, the screen shows an install command for each kind of agent on the Agent packages card, already filled in with the Manager's address and CA fingerprint. Once agents are enrolled, select Install agent in the page header to see the same commands.
-
Under Storage agent, select Copy command.
-
Copy
CygnaDR.StorageAgent.msito the storage machine, and open an elevated command prompt in that folder.The Manager holds the package in the
redistfolder in its program folder. You can also download it with the download button beside the storage agent command, which needs theagents.managecapability, or withcdr agent package download storage. -
Paste the command, replace
<path>with your storage root and<token>with the enrollment token, and run it. The command looks like this:msiexec /i CygnaDR.StorageAgent.msi /qn MANAGERADDRESS=https://10.0.0.10:5211 MANAGERCAFINGERPRINT=<fingerprint> STORAGEROOT=E:\CygnaDR ENROLLMENTTOKEN=<token>
The installer installs and starts the
CygnaDRStorageAgentservice. The agent connects to the Manager and enrolls.
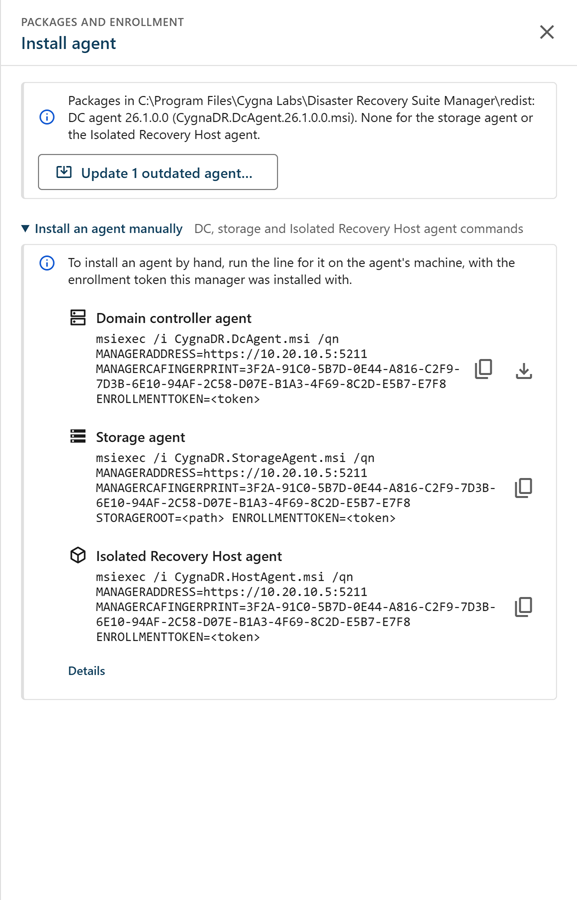
Before you rely on the fingerprint in the command, compare it with the one in the Manager's event log. Use the Manager's IP address in MANAGERADDRESS, not its name: the Manager is not joined to the domain, so its name is often not in DNS, and DNS may be down during a recovery. If the Manager has more than one address, the Agents screen lists the others; choose the one the storage machine can reach.
Note: The enrollment token is a credential that can enroll new agents. Windows Installer masks it in installer logs, but do not leave the command in scripts or command history.
The package is signed by Cygna Labs Corp. To check it before you install, run Get-AuthenticodeSignature CygnaDR.StorageAgent.msi in PowerShell and expect the status Valid, or open the file's Properties > Digital Signatures tab.
The program files go to %ProgramFiles%\Cygna Labs\Disaster Recovery Suite Storage Agent, and the agent's state and logs to %ProgramData%\Cygna Labs\Disaster Recovery Suite Storage Agent. The installer also places the recovery agent beside the storage agent; it is copied into each recovery image and is not installed or enrolled separately.
Verify the storage agent
To verify the storage agent:
-
In the console, select Administration > Agents.
The storage machine is listed with Agent type Storage and Connection Connected.
-
Select Protection > Repository.
Within a few minutes, the screen shows the storage machine's capacity.
If the agent does not appear, see Agent Enrollment and Connectivity.
Machines with more than one network address
The storage agent tells domain controllers to write to \\<address>\<share>, using an address it detects on its own machine, so that backups do not depend on DNS. On a machine with more than one plausible address, the agent cannot tell which network domain controllers arrive on, so it advertises its machine name instead. Backups then depend on the domain controllers resolving that name through DNS.
On a multi-homed storage machine, set the address yourself: select Administration > Configuration, select the Storage agents tab, and in the Staging group set Advertised host to the address domain controllers should use. Save the change and restart the storage agent:
Restart-Service CygnaDRStorageAgent
Local groups the agent creates
When it starts, the storage agent creates three local groups on the storage machine. CygnaDR Administrators has access to the vault, the staging folder, and the Manager's configuration backups. CygnaDR Staging Writers and CygnaDR Vault Readers hold only the accounts the agent creates for backup jobs and restores. To give a local account access to the backups, add it to CygnaDR Administrators rather than editing folder permissions. Do not add accounts to the other two groups yourself. For what each group is for, see Accounts and Permissions.
Optional: remove local administrators from the vault
By default, the local Administrators group keeps access to the vault, staging, and manager-backups folders. You can remove it, leaving only SYSTEM and CygnaDR Administrators. This is not a hard barrier, because a local administrator can take ownership of the folders. It does mean that reading the backups requires a deliberate ownership change that leaves evidence, instead of looking like normal administration.
To remove local administrators from the vault:
-
Add at least one local account to the CygnaDR Administrators group, for example:
Add-LocalGroupMember -Group "CygnaDR Administrators" -Member storageadmin
The setting is refused while the group is empty, so that you cannot lock yourself out of your own vault.
-
Select Administration > Configuration, and then select the Storage agents tab.
-
In the Vault group, turn on Remove BUILTIN\Administrators from the vault, and select Save.
-
Restart the storage agent.
The agent rewrites the folder permissions when it starts.
For the other storage agent settings, see Settings Reference.