Installing and Setting Up
A Cygna Forest Recovery deployment has three installed components: the Manager, the storage agent on the storage machine, and a DC agent on each domain controller. An optional fourth, the Isolated Recovery Host agent, runs test restores of your backups on a Hyper-V host. All of them install from silent MSI packages with no setup wizard. After installation you finish the setup in the console: you claim the Manager, apply the license key, connect storage, provide installation media for full system recovery, and create backup policies.
This chapter assumes you have planned the deployment. For requirements, ports, and accounts, see Planning Your Deployment.
Order of operations
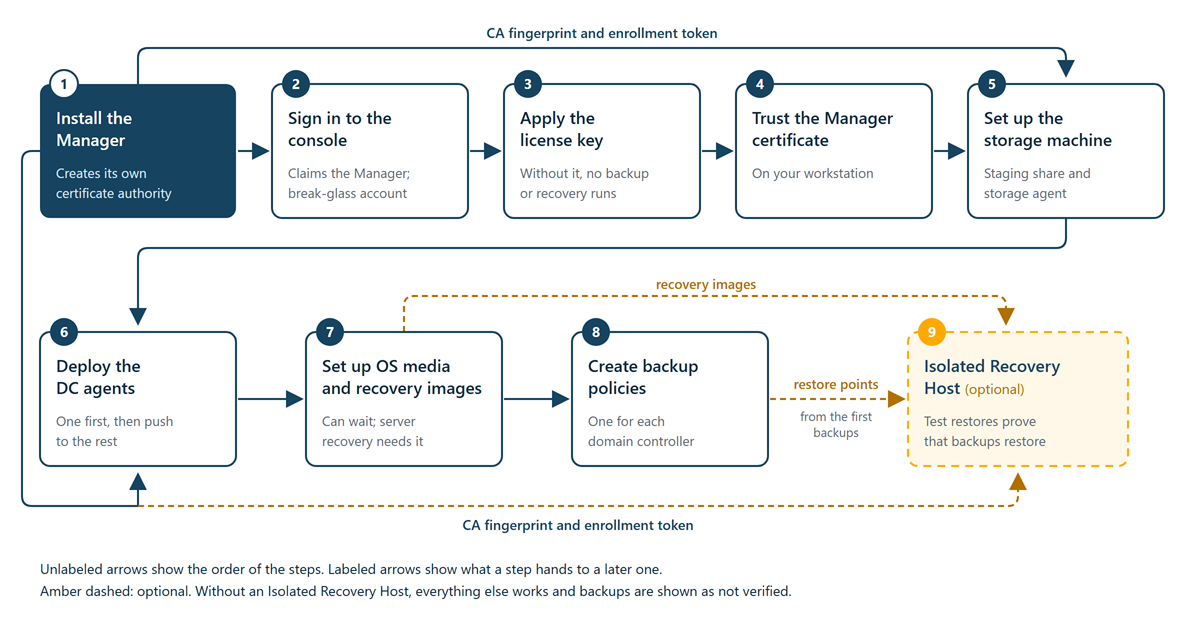
Follow this order. Each step depends on something the step before it creates.
-
Install the Manager. The Manager creates its own certificate authority (CA) the first time its service starts. Every agent is installed with that CA's fingerprint and with the Manager's enrollment token, so you cannot install an agent until the Manager is running.
-
Sign in to the console straight away. A new Manager has no operator accounts. The first person to open the console completes the one-time setup and receives the break-glass account, which holds every capability. Do this immediately after installing, so that nobody else can claim the Manager.
-
Apply the license key. A new Manager has no license, and without one it refuses every backup and recovery operation. Apply the key Cygna sent you on the License screen as soon as you have signed in.
-
Trust the Manager certificate on your workstation. The console uses a certificate issued by the Manager's own CA, so browsers warn until you trust that CA.
-
Set up the storage machine. Backups need somewhere to go. Prepare the storage volume and the staging share, and then install the storage agent.
-
Deploy the DC agents. Install the agent on one domain controller first. It reports every domain controller in its forest, and you can then push the agent to the rest from the console.
-
Set up OS media and recovery images. Restoring a whole server needs a recovery image for its operating system, which the storage agent builds from Windows Server ISOs that you supply. DC state recovery does not need one, so you can do this step later, but full system recovery is unavailable until you do.
-
Create backup policies. No backup policy exists by default. Nothing is backed up until you create one for each domain controller.
-
Set up an Isolated Recovery Host (optional). Test restores need backups to restore and recovery images to start from, so set up the host once both exist. Without a host, everything else works and backups are shown as not verified.
What you need on hand
Gather these before you start:
- Machines—A machine for the Manager and a machine for storage, both running 64-bit Windows Server 2019 or later, neither joined to a domain, each with a fixed IP address (static or a reserved DHCP lease). One machine can hold both. A domain controller can never be the storage machine.
- Installer packages—
CygnaDR.Manager.msi,CygnaDR.StorageAgent.msi,CygnaDR.DcAgent.msi, and, if you use an Isolated Recovery Host,CygnaDR.HostAgent.msi. The Manager package carries a copy of each agent package: the DC agent package for pushing from the console, and the others for downloading from the Agents screen and for updating agents. Every package and program file is signed by Cygna Labs. - A Hyper-V host (optional)—A machine for the Isolated Recovery Host, not joined to a domain. A dedicated machine is recommended. For its sizing and other requirements, see Isolated Recovery Host (optional).
- A license key—The Cygna Forest Recovery license key that Cygna sent you. See Licensing.
- An enrollment token—A long random secret that you generate. The Manager is installed with it and every agent presents it to enroll. See Installing the Manager.
- IP addresses—The Manager's address, which agents dial, and the storage machine's address, which domain controllers write backups to. Agents use addresses rather than names so that they keep working when DNS is down.
- A storage path—An absolute path on the storage volume for the storage root, for example
E:\CygnaDR. See Sizing Backup Storage. - An administrator account for the domain controllers—An account that is a local administrator on each domain controller (Domain Admin in most environments), to push the DC agent. It is used for the installation only and never stored.
- Windows Server ISOs—Installation media matching each Windows Server build, edition, and installation type your domain controllers run, for full system recovery.
- A safe place offline—Somewhere to record the break-glass credential, the recovery passphrase, and the enrollment token. You need these to sign in and to rebuild the Manager when nothing else works. See Manager Day-One Checklist.